Webhook
| Component | Type | Description | |
|---|---|---|---|
 | Webhook | ▶️ trigger | import data and start a workflow via webhook |
The Webhook component allows you to trigger a workflow in real-time when data is received from another platform.
What is a webhook?
Webhooks are one way that one app can communicate with another app. The webhook component allows another app to send data to Workflow86 and trigger a workflow. What makes webhooks special is that they allow you to send data in real-time, as something occurs. Webhooks must have a data source pointing to an endpoint - the data source is the app sending the data and the endpoint is essentially the delivery address. The endpoint will wait for data to be sent to it, and then reacts when it receives something.
Setting up the webhook
Once you have opened the webhook component on the canvas, you will see the endpoint which will receive any requests.
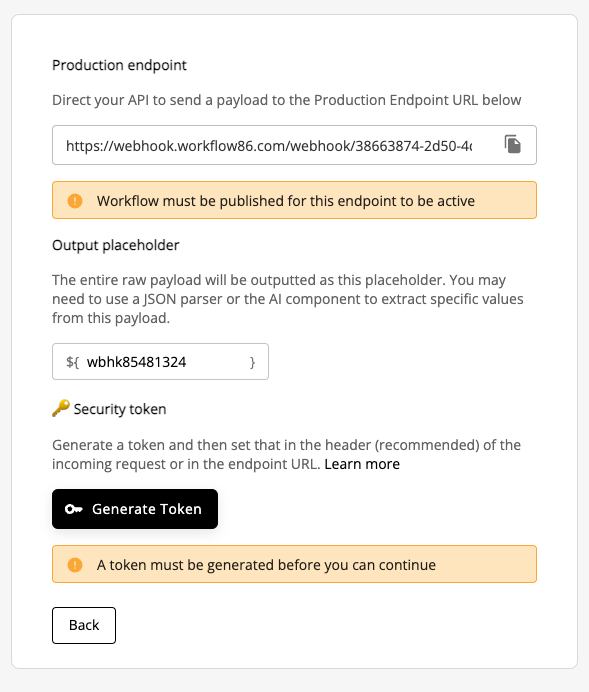
Before the webhook can work, you will need to generate a token. Click the generate Token button to generate the token.
Generating and setting the token
Before the webhook can work, you will need to generate a token. Click the generate Token button to generate the token.
A dialog will appear with the token. Copy and paste the token or download it - this is the only time you will be able to see the token. Once you close this dialog, it cannot be viewed again.

Your token is essentially a password into your workflow - if you have lost it, forgotten it, misplaced it, or think someone else might know it, you must delete the token and generate a new token.
There are two ways to set the token in any incoming request to the webhook component.
Setting the token in the header (Recommended)
The first method is the most secure and recommended method, and involves placing the token as a header in the incoming webhook play load, with "token" as the header key, and your token as the header value i.e. "token: you_token_here". Depending on the app, there will typically be a "add custom header" button that will allow you to configure this property.
curl -X POST https://webhook.workflow86.com/webhook/YOUR-WORKFLOW-ID \
  -H "Content-Type: application/json" \
  -H "token: your_token_here" \
  -d '{
    "name": "John Doe",
    "email": "john@example.com",
    "event": "user_signup",
    "timestamp": "2024-01-15T10:30:00Z"
  }'
Setting the token in the URL
The second method is to set the token inside of the Production Endpoint URL. This method is only recommended when the first method cannot be done. To use the second method, add "?token=your_token_here" to the end of the Production Endpoint URL. It should look something like this (inserting your actual token instead of "you_token_here"):
curl -X POST "https://webhook.workflow86.com/webhook/YOUR-WORKFLOW-ID?token=your_token_here" \
  -H "Content-Type: application/json" \
  -d '{
    "name": "John Doe",
    "email": "john@example.com",
    "event": "user_signup",
    "timestamp": "2024-01-15T10:30:00Z"
  }'
This method is considered less secure because you are disclosing your token in the Endpoint URL itself.
Triggering a workflow
Once generated, make sure to publish the workflow before the webhook endpoint becomes active and will trigger workflows.
Extracting values from the output
When triggered, the component will output the entire webhook as a JSON string. We recommend you use the Run Code or AI Assistant to extract values or parse the JSON.
Code Examples
Here are examples of how to send data to your webhook endpoint using various methods and programming languages.
Using curl
Method 1: Token in header (Recommended)
curl -X POST https://webhook.workflow86.com/webhook/YOUR-WORKFLOW-ID \
  -H "Content-Type: application/json" \
  -H "token: your_token_here" \
  -d '{
    "name": "John Doe",
    "email": "john@example.com",
    "event": "user_signup",
    "timestamp": "2024-01-15T10:30:00Z"
  }'
Method 2: Token in URL
curl -X POST "https://webhook.workflow86.com/webhook/YOUR-WORKFLOW-ID?token=your_token_here" \
  -H "Content-Type: application/json" \
  -d '{
    "name": "John Doe",
    "email": "john@example.com",
    "event": "user_signup",
    "timestamp": "2024-01-15T10:30:00Z"
  }'
Using Python
Method 1: Token in header (Recommended)
import requests
import json

webhook_url = "https://webhook.workflow86.com/webhook/YOUR-WORKFLOW-ID"
token = "your_token_here"

headers = {
    "Content-Type": "application/json",
    "token": token
}

data = {
    "name": "John Doe",
    "email": "john@example.com",
    "event": "user_signup",
    "timestamp": "2024-01-15T10:30:00Z"
}

response = requests.post(webhook_url, headers=headers, json=data)
print(f"Status Code: {response.status_code}")
print(f"Response: {response.text}")
Method 2: Token in URL
import requests
import json

webhook_url = "https://webhook.workflow86.com/webhook/YOUR-WORKFLOW-ID"
token = "your_token_here"

# Append token to URL
url_with_token = f"{webhook_url}?token={token}"

headers = {
    "Content-Type": "application/json"
}

data = {
    "name": "John Doe",
    "email": "john@example.com",
    "event": "user_signup",
    "timestamp": "2024-01-15T10:30:00Z"
}

response = requests.post(url_with_token, headers=headers, json=data)
print(f"Status Code: {response.status_code}")
print(f"Response: {response.text}")
Using JavaScript (Node.js)
Method 1: Token in header (Recommended)
const axios = require('axios');

const webhookUrl = 'https://webhook.workflow86.com/webhook/YOUR-WORKFLOW-ID';
const token = 'your_token_here';

const data = {
  name: 'John Doe',
  email: 'john@example.com',
  event: 'user_signup',
  timestamp: '2024-01-15T10:30:00Z'
};

axios.post(webhookUrl, data, {
  headers: {
    'Content-Type': 'application/json',
    'token': token
  }
})
.then(response => {
  console.log('Status Code:', response.status);
  console.log('Response:', response.data);
})
.catch(error => {
  console.error('Error:', error.message);
});
Method 2: Token in URL
const axios = require('axios');

const webhookUrl = 'https://webhook.workflow86.com/webhook/YOUR-WORKFLOW-ID';
const token = 'your_token_here';

const data = {
  name: 'John Doe',
  email: 'john@example.com',
  event: 'user_signup',
  timestamp: '2024-01-15T10:30:00Z'
};

// Append token to URL
const urlWithToken = `${webhookUrl}?token=${token}`;

axios.post(urlWithToken, data, {
  headers: {
    'Content-Type': 'application/json'
  }
})
.then(response => {
  console.log('Status Code:', response.status);
  console.log('Response:', response.data);
})
.catch(error => {
  console.error('Error:', error.message);
});